What is Caching and Why is it Important for Your WordPress Website?
A faster, user-friendly website is crucial in the online world. But how do you ensure that your website is always blazing fast? That’s where caching comes in. Yet many people don’t understand exactly what caching does, why it’s important, or how to use it. Don’t worry, we’ll explain it step by step.
Table of contents

What is caching in simple terms?
Caching is a way to make your website faster. It works by storing temporary copies of your web pages so that visitors can view these copies instead of reloading the entire website. This process saves time and provides a smoother user experience.
There are different types of caching:
- Browser cache: The browser stores copies of images, scripts, and styles.
- Server cache: The server stores complete web pages to display them faster.
- Plugin Caching: Plugins like Breeze manage the cache on your WordPress site.
Why is caching crucial for your website?
Caching offers more benefits than just speed. Here are some key reasons why caching is essential:
- Improved speed and user experience
Fast websites retain visitors longer and increase the chance of conversion. - SEO Benefits
Search engines like Google reward fast websites with better positions in search results. - Cost savings
Efficient server load means you pay less for hosting and resources, especially during peak traffic.
What are the disadvantages of caching?
While caching offers many benefits, there are also some drawbacks to consider:
- Changes that are not immediately visible
When you edit a page, visitors may still see the old, cached version. - Complexity in management
Incorrectly configured caching can lead to errors, such as broken pages or missing content. - Browser cache conflicts
Even after clearing the server cache, the browser cache may still display outdated data.
Why don’t I see my changes right away?
One of the most common questions we get is: “I changed something on my website, but I don’t see any difference. What’s wrong?”
The answer: caching. The temporary copy (the cache) is still shown, so your changes are not immediately visible. This can be frustrating, but it is easily solved by clearing the cache.
How do you clear the cache with Breeze?
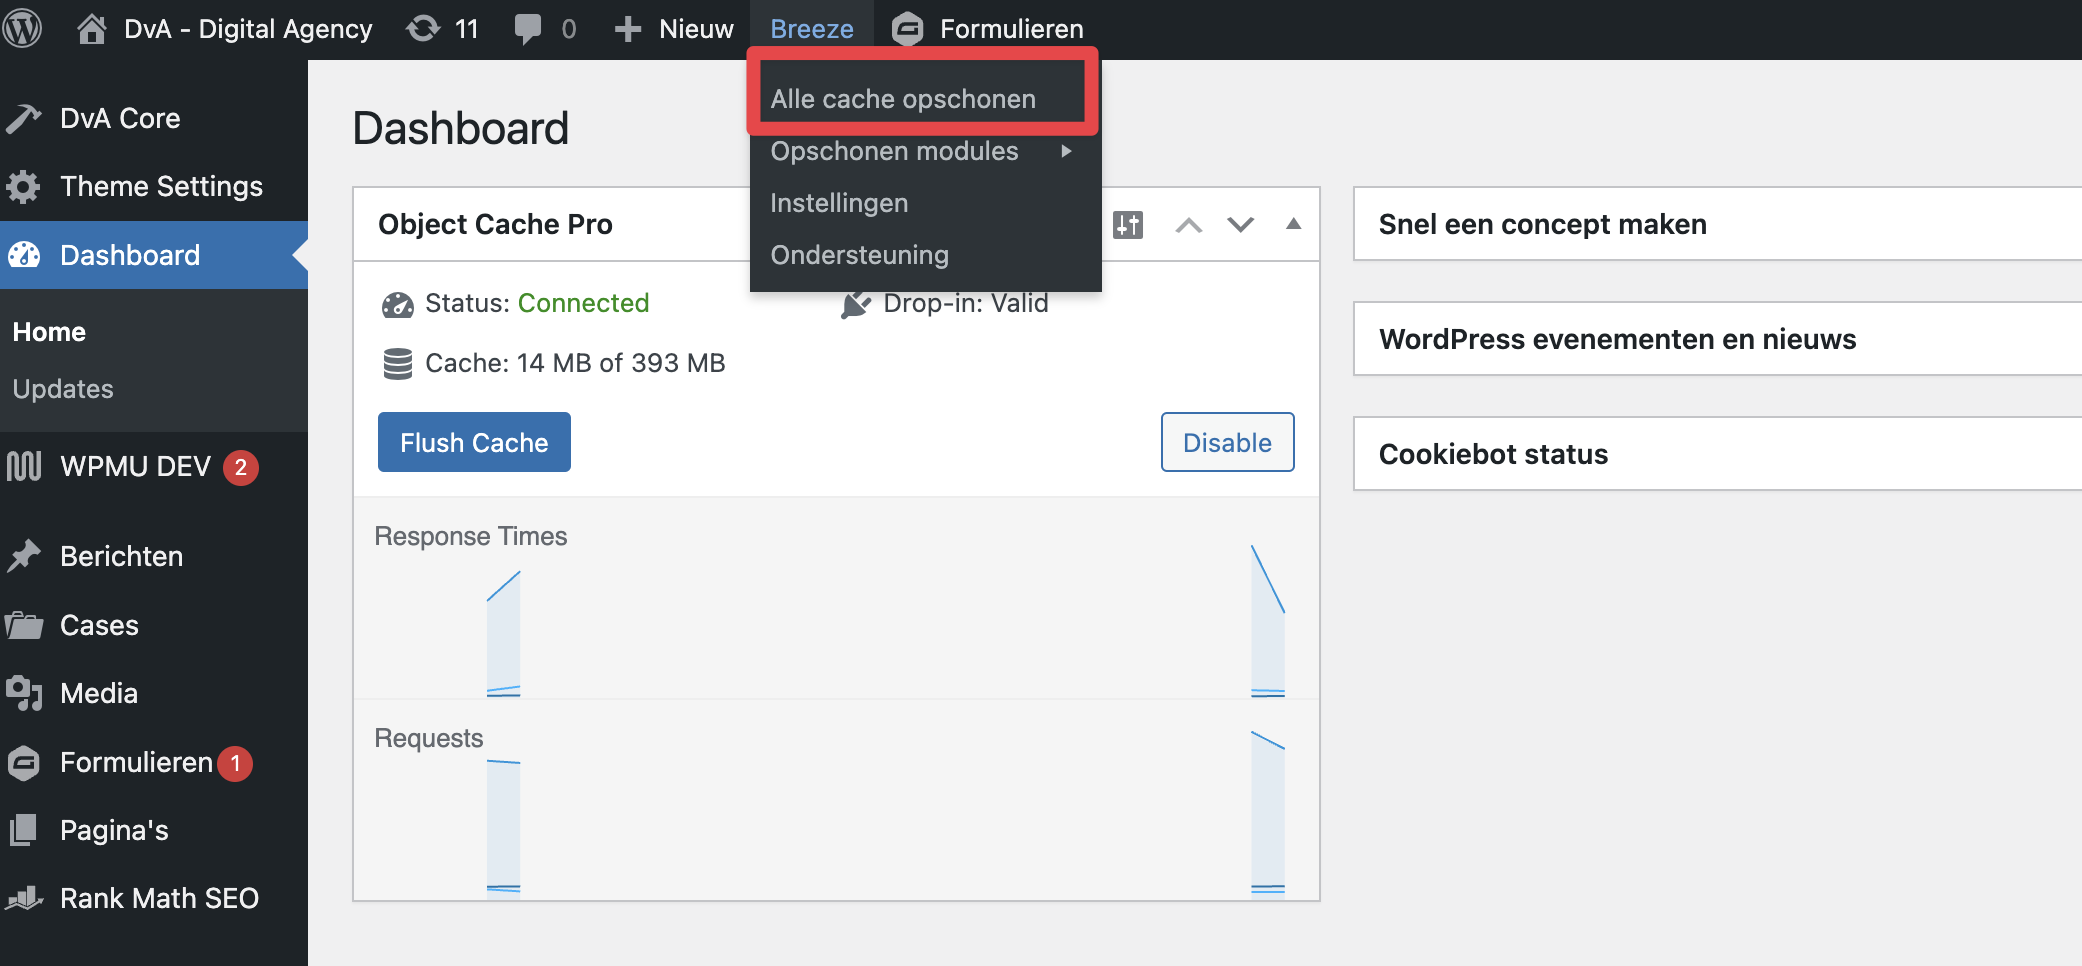
If you are using Cloudways Breeze plugin for caching, follow these steps to clear the cache and make your changes visible:
- Log into your WordPress dashboard.
- Click on “Breeze” in the left menu.
- Click the “Purge Cache” button.

That’s it! Breeze will now remove the temporary copies of your website, making the latest version visible.
Tip for browser cache:
If you still don’t see the changes, try clearing your browser cache. To do this, use the key combination Ctrl + F5 (Windows) or Cmd + Shift + R (Mac).
Extra tips:
- Minify CSS and JavaScript: Breeze offers the ability to compress files, which makes your website load faster.
- CDN Settings: Combine caching with a Content Delivery Network (CDN) to deliver files faster globally.
Caching Tips and Best Practices
- Automatic cache refresh: Set Breeze to automatically refresh the cache after changes.
- Combine caching with optimization: Think about compressing images and using lazy loading.
- Test regularly: Use tools like Google PageSpeed Insights to measure your website’s performance.
- Manage browser cache: Instructions for clearing your browser cache are important for your visitors. For Windows: Ctrl + F5. For Mac: Cmd + Shift + R.
Conclusion
Caching is an essential part of your WordPress website. It ensures speed, a better user experience and a higher Google ranking. Although caching can sometimes cause some confusion, you can easily solve this by clearing the cache. With the Breeze plugin, this is just a few clicks.
At DvA we ensure that caching is not an obstacle, but a powerful tool for your online success.


